A step-by-step guide to using 'Manage Events' module on RxTro to reach the right audience at the right time.
Effective communication is paramount for any organisation, whether it's trying to convey a very dynamic message about a product, a therapy area, or just introducing their services. Recognising the limitations of traditional, fragmented methods like fax and face-to-face communication for event promotion, RxTro is excited to introduce its innovative Events Module.
RxTro has designed this powerful new feature to modernise your audience connection, drive engagement, and foster collaboration within the medical community.
Simple and Flexible Event Creation:
Creating events with RxTro is intuitive and adaptable to your needs. Whether you're hosting a face-to-face meeting or an online webinar, the module allows you to easily:
-
Nominate the specific time and day of your event.
-
Clearly specify the online or face-to-face format.
-
Provide comprehensive details using a free-text field for agendas, speaker biographies, and other essential information.
-
Seamlessly link to your existing registration page, allowing you to maintain your preferred internal processes for RSVPs and sign-ups.
Are you prepared to learn how to incorporate your events into the RxTro platform? Here is a step-by-step guide to adding events on RxTro:
Step 1: Accessing the Event Creation Form
To begin setting up your event, please follow these simple steps:
- First, log in to the RxTro platform. Make sure you're signed into your account.
- Next, find the 'Products & services' section. This is where you'll manage your offerings. Navigate to this area within the platform.

- Then, click on 'Manage Events'. This action will open the event creation form where you can input all the necessary details.
- Before you start filling out the form, please take a moment to read the 'Preliminary Information'. This section provides important context and guidelines.

- Once you've reviewed the preliminary information, click the 'Next' button. This will take you to the first step of the form, where you can begin entering your event details.
Step 2: Enhance Your Event's Visibility
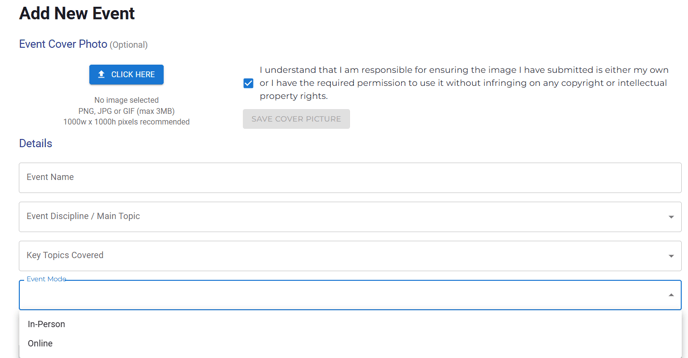
Let's start by making your event visually appealing!
- Do you have an image to showcase your event? If so, please begin by uploading it here. While this is optional, adding an image can significantly improve how your event looks to potential attendees.
Now, let's fill in some essential details about your event:
- What is the name of your event? Please provide a clear and engaging title.
- What will attendees learn about? Briefly describe the main topics or key areas that will be covered during the event.
- How will the event be delivered? Indicate the mode of delivery (e.g., online, in-person, hybrid).

Step 3: Provide Event Specifics
To ensure your event reaches the right audience and attendees have all the necessary information, please complete the following:
- When is the event happening? Enter the date and start time.
- How long will it last? Indicate the event duration.
- What time zone should we use? Selecting the correct time zone is crucial for accurate reminders and broad participation.
- Where is the event located?
- Offline: Provide the name of the venue and its full address.

- Offline: Provide the name of the venue and its full address.
- Online: Enter the joining link and any specific instructions, such as registration steps or required pre-event reading.
- Tell us more about the event: Use the rich-text editor below to provide a detailed description. You can include the event agenda, information about different sessions, speaker details, and anything else attendees should know.

Step 4: Event Contact Details
To ensure attendees and interested parties can easily reach out with any questions, please provide the following contact information:
- Organisation: If there's a specific organisation associated with this event, please enter its name.
- Phone Number: Provide a phone number that can be used for event-related inquiries.
- Email Address: Enter the primary email address for event-related communication.

Step 5: Review and Agreement
Before submitting your event, please review the following statements and confirm your understanding and agreement:

Ready to create your event?
Log in to RxTro, navigate to 'Products & services,' and click 'Manage Events' to get started! For any questions or assistance, contact us at support@rxtro.com. We would be happy to assist!

