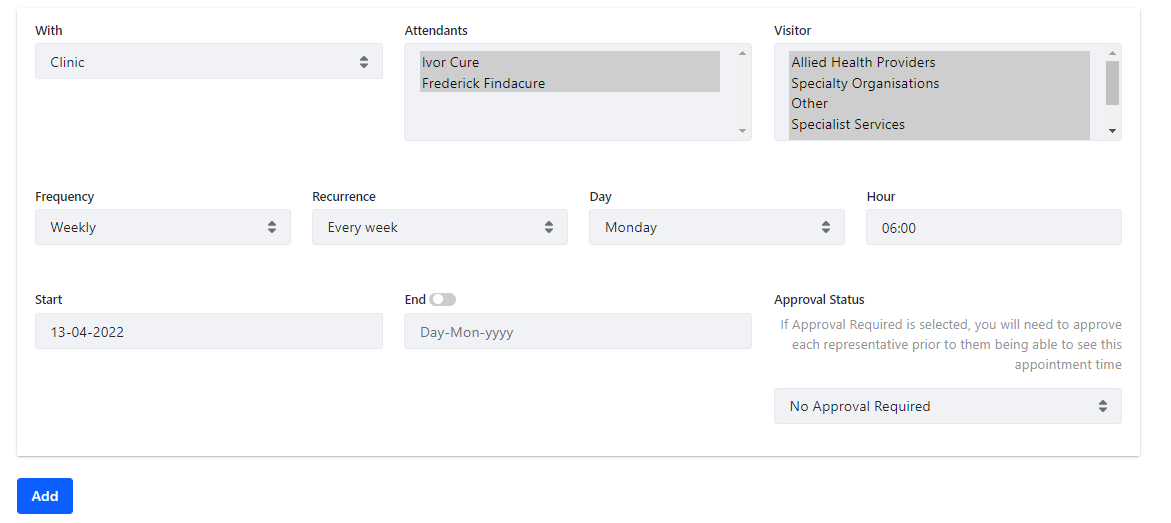
The clinic can add and manage their appointment times by completing a quick form in their RxTro account under the tab Clinic Appointment times.
You need to have added at least one Doctor to your RxTro account under the My Medical Staff Tab before creating the appointment times.
The below outlines the quick and easy steps to setting up your available appointment times for rep bookings. You are able to change these at any time should you wish.
There are 3 options for creating the appointment times: -
- A clinic appointment time
- An individual doctor appointment time
- An Approval Required appointment time.
If you are looking to set-up this option, please refer to this knowledge base article.
How to nominate a specific Clinic or Individual Doctor Appointment time
- Log-In to RxTro
- Click on the tab: Clinic Appointment Times
-
You will see the heading “My Schedule”.
How to Complete the Appointment Form:
1. With relates to the appointment type. The clinic has the option to set either a clinic appointment or an individual doctor appointment. Click on the box and select from the drop down: Clinic or Individual
2. Attendants relates to the doctors in the clinic. If you have selected an individual appointment you would then select the relevant doctor from the list of attendants.
3. Visitor relates to the different categories of Representatives that are in RxTro. This gives the clinic control over the level of their availability to reps:
If you select all categories under the visitor option this will make the appointment available and visible to all representatives in the system.
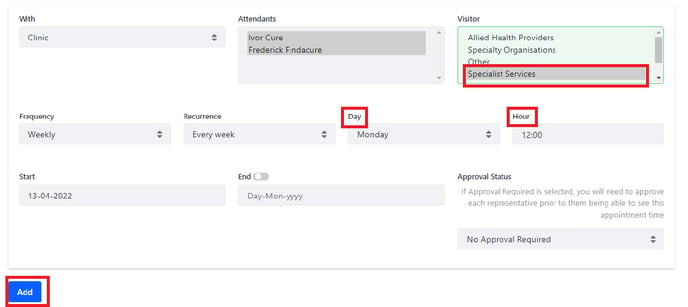
You can also use this tab to make a particular day available to a particular group. For example to make Monday's at 12pm available to specialists you would complete the form Selecting Monday 12pm and in the visitor option only select Specialist Services (as per the example below). This would create an appointment time that would only be visible to any reps under the Category: Specialist Services.

4. Frequency allows you to set if it is a weekly or monthly appointment.
5. Recurrence is dependent on what you select in the Frequency tab.
If you select Monthly then under the Recurrence option you will select if it is the
First, Second, Third or Fourth Week of the month.
If you select Weekly under the frequency option you will then select if it is
every week, every two weeks or every three weeks.
6. Day- select which day of the week the appointment will be
7. Hour- click on the box and select the appointment start time from the drop down options.
8. Start- this is the date you would like the appointments to begin and be available for reps to start booking
9. End- The appointment will continue on a rolling 12 month calender. If you only want to make the appointment available for a specific period of time you would enter an end date. The appointment will drop off your schedule after the end date you select passes.
10. Approval Status- The approval Status gives the you further control over the appointment time. If you select Require approval from the drop down, the representatives will not be able to see the appointment availability until the clinic has approved the reps request for an appointment. This option is typically used in situations where the clinic may want to leave this appointment slot open for specific specialist appointments, or for new products or if there is an education meeting in the area.
11. Click ADD once you are happy with the details in the form. The appointment will now appear in your schedule at the top of the page and will populate on the tab Future and Previous Appointments.
For more information refer to How do I control which reps can make appointments?
Refer here for - How do I 'block out/make unavailable' a range of dates from my calendar?

